
The Batch That Broke: Chocolate Orange Deluxe Cookies That Finally Hold Their Shape
Dark chocolate, fresh orange zest, and a hard‑won fix for cookie dough that used to bake into one big puddle—now thick, chewy, and reliably sturdy enough for gifting trays and bake sales.
Published: March 30, 2026
Jump to RecipeDisclosure: This post contains affiliate links. If you click on one and make a purchase, I may receive a small commission at no additional cost to you. As an Amazon Associate, I earn from qualifying purchases.

After a tray of chocolate–orange cookies fused into a single sticky sheet, I went back to the mixing bowl and fixed everything: butter temperature, orange zest, and cocoa balance. These deluxe cookies bake up thick, chewy, and intensely flavored—without a hint of spread.
When a PTA Holiday Table Turned into One Giant Chocolate–Orange Cookie
On a Thursday night in early December 2021, I opened my oven expecting neat, stackable chocolate–orange cookies for my son’s PTA holiday table and instead found one massive, shiny, orange-scented cookie sheet. Not a panofcookies. A single, merged slab with chocolate islands and crisp, lacy edges creeping right up the sides of the pan.
I had been too pleased with myself when I stirred melted butter and a generous splash of fresh orange juice into the dough at 11:15 p.m., convinced I’d hacked my way to “chewy and intense” in one step. By 11:45 p.m., I was trying to saw apart cookie shapes with an offset spatula while the house smelled like dark chocolate and citrus and my bake-sale containers sat empty on the counter.
Those cookie puddles are the reason this Chocolate Orange Deluxe Cookies recipe exists. Every choice here—cool room temperature butter instead of melted, rubbed-in zest, a specific mix of brown and white sugar, an extra yolk, and a strict chill—comes from rescuing that failure. The goal is clear: thick, chewy dark-chocolate cookies that actually hold their shape on a holiday tray, in a bake-sale box, or in a gift tin.
So, if you’ve ever watched your carefully scooped cookie dough flatten into a single, paper-thin sheet, this is the version that finally stopped that from happening in my kitchen.
The Night I Learned Melted Butter and Fresh Orange Juice Don’t Play Nice
Let me walk you through the exact sequence of disasters, because it matters for how we mix this dough now.
Batch 1 (The Bake-Sale Disaster).I melted the butter completely, whisked in sugars, added two full tablespoons of orange juice, one egg, a pile of zest, and just enough flour to make something that looked like soft brownie batter. I chilled it for a token 15 minutes—because the oven was already hot and I was tired—and baked at 350°F (175°C). After 12 minutes, I had that infamous cookie sheet. Zero individual cookies, lots of muttered words.
Batch 2 (Overcorrecting with Flour).The next day, I tried again, still using melted butter and the same amount of juice, but I added more flour “until it looked right.” You can probably guess what happened: the cookies held their shape, but the texture turned dry and cakey. The orange and chocolate got lost in all that starch.
Batch 3 (Turning Down the Juice).I cut the orange juice way back, but kept the melted butter. The dough seemed okay going into the fridge, but in the oven, the fat still melted too fast. The cookies spread less but still ended up too wide and thin, especially compared to the thick, bakery-style look I wanted for gifting.
By this point I had three sets of notes, all with a common thread: melted butter plus any meaningful amount of citrus juice was a problem. The cookies either spread too far, or I had to add so much flour to compensate that the texture suffered.
Batch 4 (The Turning Point).I finally did what I should have done in the first place: I went back to the classic creaming method. Cool room temperature butter (around 65°F/18°C), orange zest rubbed into the sugars first, then creamed until light and slightly fluffy. I kept the orange juice, but only about 15 g (1 tablespoon), just to reinforce the flavor without drowning the dough. I also added a single extra egg yolk for chew and richness, and I committed to afull 60-minute chill.
That fourth batch was the first one that came out of the oven asindividualcookies: thick, gently domed, with soft centers and edges that stayed inside the boundaries of the scoop. Over the next few days I baked two more batches to confirm the timing and texture, but the essential fix never changed: cool butter + creaming + modest juice + chill.
The recipe you’re about to bake is that hard-won version. Every instruction about butter temperature, orange zest, and chilling is there because a real pan of my cookies broke before I got it right.
Why This Version Holds Its Shape: Cool Butter, Extra Yolk, and Rubbed-In Orange Zest
Before we get into the step-by-step process, it helps to understand how each core ingredient supports the goal:thick, chewy chocolate–orange cookies that don’t bake into puddles.

Unsalted butter (170 g, cool room temperature).This is the backbone of both flavor and structure. At around 65°F (18°C), the butter is soft enough to cream with sugar and trap air, but still firm enough that it doesn’t liquefy the second it hits the oven. In my failed batches with melted butter, the fat turned fully liquid before the structure of the dough had a chance to set, so the cookies spread out instead of up.
Light brown sugar (150 g) + granulated sugar (100 g).The ratio of brown to white sugar matters more than I wanted to admit. Brown sugar (with its molasses) brings moisture and chew; white sugar brings spread and crisp edges. In the final formula, the slightly higher brown sugar amount keeps the centers soft, while the granulated sugar is just enough to give the edges a gentle snap and promote browning at 350°F (175°C) without over-spreading.
Egg + extra egg yolk.One whole large egg plus one extra yolk gives structure from the proteins and richness from the additional fat, without adding as much liquid as a second whole egg. When I tried using just one egg, the cookies were a little dry and didn’t have that bendy chew in the middle. The extra yolk fixed that without pushing the dough into sticky territory.
Pure vanilla extract (about 8 g / 2 teaspoons).Vanilla doesn’t compete with the orange; it fills in the background and keeps the chocolate from tasting flat. With citrus and dark chocolate together, I find skimping on vanilla makes the whole cookie taste oddly hollow.
Fresh orange zest (about 8 g / 2 tablespoons), rubbed into the sugar.This is where the orange flavor primarily lives. Rubbing the zest into the brown and white sugars before adding butter does two things: it releases aromatic oils (so you taste orange throughout, not just in occasional bitter flecks) and it avoids extra liquid. This means we get strong citrus flavor without more juice that could encourage spreading.
Fresh orange juice (15 g / 1 tablespoon).This is just enough to reinforce the citrus without turning the dough sticky. In my test batches, going even 5 g (1 teaspoon) higher changed the way the dough behaved in the oven. So I stopped trying to get big flavor from the juice and focused on zest + technique instead.
Dry ingredients: flour, cocoa powder, leavening, and salt.In your bowl, you’ll whisk together the measuredall-purpose flour,cocoa powder,leavening (typically baking soda), andfine saltaccording to the recipe card. The flour gives structure, the cocoa lays down the chocolate base, the baking soda helps the cookies lift and spread just enough, and the salt ties all the flavors together. I tested with both natural and Dutch-process cocoa; I prefer a darker, Dutch-process style here for contrast with the orange, but either will work if you follow the same measurements.
Dark chocolate pieces or chips.Instead of using only standard chips, I like a mix of good-quality dark chocolate chips and chopped dark chocolate bar. The chopped pieces melt into irregular pockets, which makes every cookie a little different and gives those lovely cross-sections when you break one open. Importantly, the chocolate is folded in at the end so we don’t overwork the dough and develop extra gluten, which could make the cookies tougher.
Once you see what each ingredient contributes, the method starts to make more sense. We’re not just stirring things together; we’re managing butter temperature, sugar mix, and liquid so the cookies stay thick and chewy rather than thin and brittle.
Butter at 65°F and Other Non-Negotiables for Thick Chocolate–Orange Cookies
This is where the “why” behind the method really matters. You have a clear goal (no more cookie puddles), and there are a few non-negotiable habits that get you there.
1. Start with cool room temperature butter (around 65°F / 18°C).
Butter that’s ready for creaming should:
- Give slightly when pressed with a fingertip, but still feel cool.
- Hold its shape when you cut it; it shouldn’t smear or look shiny.
- Not be greasy or half-melted around the edges.
In my kitchen, that’s usually butter that’s been out of the fridge about 45–60 minutes, depending on the season. If your butter is too cold, it won’t cream properly; too warm, and you’re halfway back to the melted-butter problem that caused the first cookie sheet disaster.
2. Rub the orange zest into the sugars before you cream.
This step comes from a technique you’ll see in recipes by bakers like Dorie Greenspan: using sugar as a gentle abrasive to unlock citrus oils. By pinching and rubbing the zest into the brown and white sugars for 1–2 minutes, you:
- Increase the orange aroma dramatically before any heat is even involved.
- Avoid dumping zest straight into wet ingredients, where it clumps and doesn’t distribute as evenly.
- Keep the overall liquid in the dough in check, because you’re relying on oils, not more juice.
Every time I’ve skipped this and just tossed the zest in later, the flavor has been flatter and the little bits of zest more noticeable in an unpleasant, chewy way.
3. Cream the butter and orange sugar just until lightened.
You don’t need a huge, fluffy mass here like you might for a cake, but you do want the butter and sugar to combine fully and trap some air. On a stand mixer with the paddle attachment, medium speed for about 2–3 minutes usually does it. The mixture should look slightly lighter in color and be smooth, not gritty.
4. Chill the dough for at least 60 minutes.
This is the hardest rule to follow when you want cookiesnow, but it’s non-negotiable if you care about shape and texture. During that hour in the fridge:
- The butter firms back up so it melts more slowly in the oven.
- The flour hydrates, which helps the cookies hold together and stay chewy.
- The flavors meld—especially the orange and chocolate.
When I tried to shave the chill down to 30 minutes, my cookies were noticeably wider and thinner. Edible, yes. Reliable for a bake sale tray, no.
5. Preheat the oven only after chilling.
The instructions for this recipe have you line your pans first, then mix and chill the dough, and only preheat the oven to 350°F (175°C) when you’re about 15–20 minutes away from baking. This is very intentional. If you preheat right away, it’s far too easy to let the dough sit at room temperature while the oven comes up to temp, undoing most of the benefit of that hour-long chill.
Step-by-Step Walkthrough: From Grainy Orange Sugar to Scooped, Chilled Dough
Now that you know why each step matters, here’s exactly how I mix the dough so it behaves in the oven.
1. Prep your pans before you forget
Line tworimmed baking sheetswithparchment paper or silicone baking mats. Set them aside. Doing this right away means you’re not scrambling to find parchment with a bowl of soft dough on the counter later.
2. Make the orange sugar
Add thelight brown sugar (150 g)andgranulated sugar (100 g)to a large mixing bowl. Sprinkle in thefresh orange zest (about 8 g / 2 tablespoons). Using clean fingertips, rub the zest into the sugars for 1–2 minutes.
You’re looking for three cues:
- The mixture smells strongly of orange.
- The color deepens slightly from the zest and brown sugar.
- The texture feels a bit damp and sandy rather than dry and loose.
This is a tiny step on paper, but it’s the difference between “Is there orange in here?” and “Oh, this is definitely chocolate–orange.”
3. Cream in the cool butter
Add theunsalted butter (170 g, cool room temperature)to the orange sugar. Using a stand mixer with the paddle attachment or a hand mixer, beat on medium speed for about 2–3 minutes, scraping down the bowl once or twice. The mixture should be well combined, slightly lightened in color, and look creamy rather than greasy.
In one of my early tests, I under-creamed this stage and ended up with streaks of butter that melted into small greasy pools on the baking sheet. Make sure the butter is fully blended with the sugar before you move on.
4. Beat in egg, egg yolk, vanilla, and orange juice
Add theroom temperature egg, theextra egg yolk, and thepure vanilla extract (about 8 g / 2 teaspoons). Beat on low to medium speed until the mixture is smooth and emulsified—no streaks of egg. Then add thefresh orange juice (15 g / 1 tablespoon)and mix again just until combined.
If the mixture looks broken or curdled at this stage, pause and scrape down the sides and bottom of the bowl, then beat for another 20–30 seconds. The extra egg yolk helps stabilize things, but it’s still important that all the liquids are fully incorporated before you add the dry ingredients.
5. Mix the dry ingredients separately
In a second bowl, whisk together yourall-purpose flour,cocoa powder,leavening(usually baking soda), andfine saltusing the exact amounts listed in the recipe card. This step ensures even distribution of the cocoa and leavening so you don’t end up with bitter pockets or oddly shaped cookies.
6. Combine wet and dry without overmixing
Add the dry ingredients to the butter mixture in two additions, mixing on low speed just until there are no obvious streaks of flour. The dough will be thick and slightly sticky.
Overmixing here was one of my early mistakes when I tried to “fix” over-spreading with more flour. The more you stir, the more gluten you develop, and the tougher your cookies become. As soon as the flour disappears, stop.
7. Fold in the dark chocolate
Use a spatula to fold in yourdark chocolate pieces or chips. Again, fold only until the chocolate is fairly evenly distributed. Some variation is fine and actually makes the baked cookies more interesting to look at.
8. Scoop and chill the dough
Use a medium cookie scoop or a spoon to portion the dough into even balls and arrange them on your prepared baking sheets. For 24 cookies, you’re aiming for evenly sized scoops so they bake at the same rate.
At this point, you have two choices:
- Chill the scooped dough on the trays, loosely covered, for at least 60 minutes.
- Chill the dough in the bowl for 60 minutes, then scoop onto the trays.
I prefer scooping first, then chilling, because colder dough is harder to portion evenly. Either way, the key is the same: the dough must spend at least an hour in the fridge before it goes into the oven. When I tried baking from just 20 minutes of chill, the cookies were noticeably wider and thinner.
From Fridge to Oven: Timing, Pan Prep, and the 12-Minute Window
Once your dough has chilled, the goal is to keep it cold right up until it hits that 350°F (175°C) oven. This is where the shape is won or lost.
1. Preheat the oven at the right moment
About 15–20 minutes before you want to start baking,preheat your oven to 350°F (175°C)with a rack in the center position. This timing avoids letting the dough sit on the counter too long while the oven heats.
2. Arrange the dough balls with room to grow
If you chilled the dough in the bowl, scoop it onto the prepared trays now. If it’s already scooped, uncover the trays. Space the dough balls so there’s room for each cookie to spread without touching—how many fit per tray will depend on your scoop size, but I usually bake one sheet at a time for the most even results.
3. Bake for 12 minutes and trust the visual cues
Slide the tray onto the center rack andbake for 12 minutes. In my oven, that’s the sweet spot listed in the recipe card, and it consistently gives cookies with:
- Edges that look set but not dark.
- Centers that are puffed and just starting to lose their raw shine.
- A surface that may show a few cracks (a good sign of a chewy interior).
Resist the urge to bake until the centers look fully firm; they will continue to set up on the hot baking sheet after you pull them from the oven.
4. Cool on the sheet, then transfer
Let the cookies cool on the baking sheet for about 5–10 minutes. This gives the structure time to firm up so you can move them without tearing. Then transfer them to a wire rack to cool completely.
I like to bake one tray at a time so each batch gets the same heat exposure. When I tested two trays at once, the lower tray baked slower and spread a bit more, even with a pan rotation halfway through. If you must bake two at once, swap their positions and rotate front-to-back around the halfway mark, and expect very slight differences in thickness.
What Went Wrong with My First Four Batches (and How to Diagnose Yours)
Because this recipe was built on a very real failed batch, it’s worth laying out the main ways things can still go sideways and what each symptom usually means.
1. Cookies spread into thin puddles
Likely causes:
- Butter too warm and soft at the creaming stage.
- Insufficient chilling (less than 60 minutes).
- Too much orange juice or other added liquid.
- Under-measured flour.
In my original disaster batch, I used melted butter and a very short chill. The cookies ended up nearly 4.5 inches across and less than 0.25 inch thick. In the fixed version, they bake to closer to 2.5–3 inches wide with a noticeably thicker center.
How to fix for next time:Weigh your flour if you can, stick to the 15 g (1 tablespoon) of orange juice, make sure your butter starts at cool room temperature, and don’t shorten the chill time. Also double-check that your oven is actually at 350°F using an oven thermometer; a hotter oven can sometimes cause sudden spread before the structure sets.
2. Cookies stay tall and dry, with a cakey bite
Likely causes:
- Too much flour (often from scooping directly from the bag without fluffing or weighing).
- Overmixing once the flour is added, developing too much gluten.
- Overbaking past the 12-minute mark.
This was my Batch 2 issue when I tried to “fix” things by adding more flour without adjusting anything else. If your cookies don’t spread at all and the crumb feels more like cake than a chewy cookie, check your measuring technique. Spoon and level your flour into the cup if you’re not weighing, and mix only until the last streak of flour vanishes.
3. Greasy bottoms or butter puddles around the edges
Likely causes:
- Butter not fully creamed into the sugar, leaving streaks.
- Using a greased baking sheet instead of parchment or a silicone mat.
- Too-warm dough from sitting out while the oven preheated.
I saw this most clearly when I rushed the creaming time. Some cookies looked fine from the top, but there were visible oily spots on the parchment when I lifted them.
4. Weak orange flavor even though you used fresh zest
Likely causes:
- Skipping the “rub the zest into the sugar” step.
- Using tired, older oranges with less fragrant zest.
- Storing the dough too long (several days) without baking; some aroma fades over time.
In one test, I added the zest directly to the butter instead of the sugar. Same quantity of zest, much less aroma in the finished cookie. Massaging the zest into the sugar first gave a clear, noticeable difference in every batch where I compared the two methods.
5. Uneven batches: some thick, some flat
Likely causes:
- Inconsistent scoop sizes.
- Baking dough from different chill stages (some scoops warmer than others).
- Opening the oven door frequently and losing heat.
For the tests that went into this recipe, I used a leveled cookie scoop to keep all 24 cookies as similar in size as possible and chilled them identically. That’s how I got consistent 12-minute bakes and near-identical thickness across batches.
Smart Swaps: Turning This Dough into Gluten-Free, Nut-Free, or Extra-Chunky Variations
The base formula is designed to hold its shape, which gives you a little room to play without inviting the cookie-puddle problem back in. Here are the variations that worked best in my testing.
1. Gluten-free version
Use a1:1 gluten-free all-purpose flour blenddesigned for baking, substituting it for the regular flour by weight as listed in the recipe card. Keep everything else the same, including the 60-minute chill.
Notes from my tests:
- Texture is slightly more tender and a bit more fragile when warm, but still thick and chewy when cooled.
- The cookies sometimes show hairline surface cracks sooner, but that doesn’t affect shape.
2. Nut-free (as written) and nut-added option
The base recipe is naturally nut-free as long as your chocolate is produced in a nut-safe facility. If you want to add nuts, you can fold in a handful ofchopped toasted walnuts or hazelnutswith the chocolate. I’ve tested with up to about a small handful of nuts without noticeable change in spread.
3. Extra-chunky chocolate
If you want more pronounced chocolate pockets, use a mix of standard dark chocolate chips androughly chopped dark chocolate bar. The chopped pieces melt irregularly, giving those dramatic streaks and pools when you break a cookie open, while the chips help hold shape.
4. Stronger orange profile without extra juice
If you crave a stronger orange note but don’t want to tamper with the liquid balance, you can:
- Add a tiny splash of orange extract along with the vanilla (go very light; it’s potent).
- Press a bit of extra fresh zest onto the tops of the scooped dough balls just before baking.
I don’t recommend increasing the orange juice beyond the 15 g (1 tablespoon) in the recipe card; that was the tipping point where my test batches started sliding back toward too much spread.
Make-Ahead, Storage, and Gifting Without Squashed Cookies
Because one of my main goals for this recipe was a cookie that could survivetransport—to PTA tables, office parties, and mailer boxes—how you store and gift them matters almost as much as how you bake them.
1. The realistic time commitment
Plan on about20 minutes of active prep timeto mix and scoop the dough,60 minutes of chilling, and12 minutes of baking, plus cooling. That’s how we land at a total time of about1 hour 32 minutes, which is what you’ll see in the recipe details.
2. Storing baked cookies
Once completely cool, store the cookies in anairtight container at room temperature. They keep their best texture for about 3–4 days. To stack them without smudging the chocolate, layer parchment or wax paper between layers.
In my testing, the flavor was actually a bit better on day 2, as the orange and chocolate had more time to mingle. The edges soften slightly over time, but the centers stay pleasantly chewy.
3. Storing the dough
Chilled dough keeps well in the fridge for up to about 48 hours before baking. Any longer and the orange aroma starts to fade a bit. If you chill longer than the initial 60 minutes, let the scooped dough sit at room temperature for a few minutes while the oven preheats so the centers don’t stay too cold and underbaked.
4. Freezing for later
For longer storage, freeze the scooped dough on a baking sheet until firm, then transfer the frozen balls to a freezer bag or container. When you’re ready to bake, place the frozen dough on lined trays and bake at 350°F (175°C) until the edges are set and centers puffed. You may find they need a little longer than the time listed in the recipe card, so watch the visual cues more than the clock.
5. Gifting and transporting
Because these cookies hold their shape instead of flattening, they stack beautifully in tins and bakery boxes. I like to:
- Arrange them in a single layer with parchment on the bottom.
- Add a sheet of parchment, then a second layer if needed.
- Pack the box so they can’t slide around too much in transit.
Compared to my original melted-butter version, these survived a 30-minute car ride and a crowded bake table without fusing together or breaking at the edges, which was the whole point from the beginning.
FAQ, Baking Science Notes, and Approximate Nutrition
Why does creaming the butter matter so much here?
Creaming butter with sugar does two key things. First, the sugar crystals cut tiny air pockets into the butter, which helps the cookies rise and stay thicker instead of collapsing. Second, it evenly distributes the fat so it melts more predictably in the oven. Food science writers like Harold McGee have written extensively about how this basic technique affects structure, and it absolutely showed up in my tests: the melted-butter batches spread more and baked thinner every single time, even when the ingredient list was almost identical.
Can I skip the chilling step?
Youcan, but you will not get the same result, and you’ll be much closer to the cookie-puddle problem this recipe is designed to avoid. In one comparison test, I baked half the batch after 15 minutes of chill and half after the full 60 minutes. The quick-chilled cookies were wider, thinner, and slightly crispier; the fully chilled cookies were thicker and chewier. For the “Deluxe” version, I always recommend the full hour.
Can I use milk chocolate instead of dark?
Yes, but be aware that milk chocolate is sweeter and softer, so the overall cookie will taste sweeter and a bit less intense. I’ve tested a half-dark, half-milk mix and liked it, but for a strong chocolate–orange contrast, I still prefer mostly dark chocolate.
Do I have to use fresh orange juice, or can I use bottled?
Fresh orange juice has a cleaner, brighter flavor and is what I use in testing. Bottled juice will work in a pinch, but since we’re only using 15 g (about 1 tablespoon), I recommend squeezing it fresh if at all possible. The bigger non-negotiable is thefresh zest; that’s where most of the orange character comes from.
Can I double the recipe?
Yes. If your mixer can handle it, doubling works well as long as you:
- Scrape the bowl thoroughly so no pockets of butter or flour hide at the bottom.
- Divide the dough between trays so you don’t overcrowd the oven.
I’ve doubled this for a larger bake sale and had consistent results by baking one tray at a time.
Why do the edges brown the way they do at 350°F?
The mix of brown and white sugar, plus the proteins from the egg and egg yolk, encourages the Maillard reaction—the series of browning reactions that give baked goods their toasty, complex flavor—at 350°F (175°C). The slight extra sugar at the edges caramelizes, giving you that subtle crisp ring around the thick, chewy middle.
Approximate nutrition information
Nutrition will vary based on the exact chocolate you use and any extra mix-ins, but based on the ingredient amounts in the recipe card and a yield of24 cookies, a rough estimate per cookie is:
- Calories: about 180–190
- Total fat: about 9–10 g
- Carbohydrates: about 24–26 g
- Sugars: about 15–17 g
- Protein: about 2–3 g
These numbers are approximate and meant for general information only, not for medical or dietary planning. If you have specific nutritional needs or health conditions, it’s always a good idea to consult a registered dietitian or use a detailed nutrition calculator with your exact ingredients.
What I can say from my own experience is that these Chocolate Orange Deluxe Cookies earn their place on a tray: sturdy enough to stack and share, with a texture and flavor that came directly out of that first, broken batch on my kitchen counter.
Kitchen Essentials
The exact tools and ingredients matches I use in my kitchen to get that perfect cookie texture.
Affiliate DisclosureBest Cookie Recipe is a participant in the Amazon Services LLC Associates Program, an affiliate advertising program designed to provide a means for sites to earn advertising fees by advertising and linking to Amazon.com. As an Amazon Associate, I earn from qualifying purchases. This post may contain affiliate links, which means I make a small commission at no extra cost to you.

Maggie's Pick
OSHLANT
Cookie Scoop
"Tool for portioning cookie dough evenly"

Maggie's Pick
Fire More
Baking Sheet
"Flat metal tray used for baking cookies, pastries, and more"

Maggie's Pick
Riveira
Wooden Spoon
"Manual stirring tool for mixing ingredients"

Recipe
The Batch That Broke: Chocolate Orange Deluxe Cookies That Finally Hold Their Shape
Dark chocolate, fresh orange zest, and a hard‑won fix for cookie dough that used to bake into one big puddle—now thick, chewy, and reliably sturdy enough for gifting trays and bake sales.

PREP20min
BAKE12min
CHILL60min
YIELD24 cookies
TEMP350°F
LEVELbeginner
COST$10
SEASONfall, winter
beginner-friendlycrowd-pleaserbutterybutteregg yolkeasy
dessert,snack
vegetarian
Ingredients for Chocolate Orange Deluxe Cookies That Keep Their Shape
Portion:
Core Ingredients for Thick, Chewy Chocolate–Orange Dough (No More Cookie Puddles)
Recipe Video
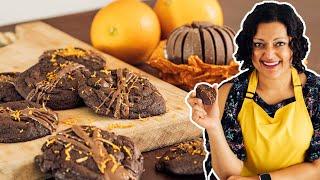
How to Make my CHOCOLATE ORANGE COOKIES RECIPE
8:36
How to Make my CHOCOLATE ORANGE COOKIES RECIPE
Production by Movers and Bakers
Step-by-Step: How I Finally Got These Chocolate Orange Cookies to Hold Their Shape
Make the Chocolate–Orange Dough Base
1
Line the pans and preheat the oven (after chilling)
Because this dough needs at least an hour to chill, you don’t actually need the oven on right away. Start by lining tworimmed baking sheetswithparchment paper or silicone baking matsand set them aside. When your dough has chilled and you’re about 15–20 minutes from baking, preheat the oven to350°F (175°C)with a rack in the center position.
Preheatingafterchilling keeps your kitchen cooler while you work and avoids the common mistake of letting the dough sit out too long while you wait for a hot oven.
If you preheat the oven before you chill the dough, it’s very easy to let the dough warm up on the counter while you wait on the oven. For this recipe, that extra softening is exactly how you drift back toward those wide, flat cookie puddles.
2
Rub the orange zest into the sugars
Add thelight brown sugarandgranulated sugarto a large mixing bowl. Sprinkle thefresh orange zestover the top. Using clean fingertips, rub the zest into the sugars for 1–2 minutes, pinching and massaging until the mixture smells strongly of orange and looks slightly damp and sandy.
This step scrapes the zest against the sugar crystals, releasing the aromatic oils so the citrus flavor runs through the whole batch instead of sitting in little bitter flecks.
If you skip rubbing the zest into the sugars and just toss it into the wet dough later, the orange flavor stays much more muted and can get lost behind the dark chocolate.
3
Cream cool room temperature butter with the orange sugar
Add thecool room temperature unsalted butter(around 65°F/18°C, soft but not glossy or melty) to the bowl with the orange-sugar mixture. Using astand mixer or hand mixeronmedium speed, cream the butter and sugars together for2–3 minutes, until the mixture looks lighter in color and slightly fluffy, and clings to the sides of the bowl.
Why this works:Starting with butter that’s slightly cool lets you beat in tiny air pockets (for lift) while keeping the fat semi-solid. In the oven, that means the cookies have time to set and hold their shape before the butter fully melts, instead of collapsing into one giant cookie sheet like my early tests with melted butter did.
If the butter is shiny and starting to look greasy before you even add sugar, it’s too warm. Pop the bowl in the fridge for 5–10 minutes, then cream. Over-soft butter here is one of the fastest ways to get cookies that spread way too much.
4
Blend in egg, egg yolk, vanilla, and orange juice
Add theegg,egg yolk,pure vanilla extract, andfresh orange juiceto the creamed butter mixture. Beat onmedium-low speedjust until everything is smooth and combined, scraping down the bowl as needed. The mixture should look creamy and uniform, without streaks of egg.
The extra yolk adds richness and chew, while the small amount of orange juice boosts the citrus flavor without making the dough soupy.
Use room temperature eggs. Cold eggs will seize the butter and make the mixture look curdled, which can lead to uneven spreading in the oven. If that happens, just keep mixing on low until it smooths out before you move on.
5
Combine the dry ingredients separately
In a medium bowl, whisk together all of thedry ingredients listed in your recipe card(this will include your flour and leavening, plus any salt and cocoa or other powders if your ingredient list calls for them). Whisk until everything looks evenly blended with no visible streaks.
Mixing the dry ingredients before they hit the wet ingredients keeps any one thing (like baking soda or salt) from clumping and creating uneven texture or flavor in the finished cookies.
Resist the urge to sprinkle leavening directly into the wet batter—it doesn’t distribute evenly that way. In this cookie, an uneven hit of baking soda can give you random ultra-puffy cookies next to thin, flat ones on the same tray.
6
Stir the dry ingredients into the wet just until combined
With the mixer onlow speed(or using a sturdy spatula), add the dry ingredients to the butter mixture in two additions. Mix only until you no longer see dry pockets of flour. Stop and scrape down the sides and bottom of the bowl to make sure no dry bits are hiding, then mix for another5–10 secondsmax.
The dough should be thick and slightly sticky, but it should hold together in a soft mound rather than flowing like cake batter.
Overmixing at this stage develops too much gluten, especially in a dough that already has moisture from brown sugar and orange juice. In this recipe, that can turn your thick, chewy cookies into tough, bready ones that don’t spread nicely.
Add Chocolate & Chill the Dough (Key to Avoiding Cookie Puddles)
1
Fold in the dark chocolate
Using a spatula, gently fold in thedark chocolate(chips, chunks, or chopped bar—whatever your ingredient list specifies) until it’s evenly distributed throughout the dough. Make sure there are no pockets with all chocolate and no dough.
Folding by hand instead of beating with the mixer helps keep the dough from warming up and getting overworked.
If you beat the chocolate in on high speed, you’ll warm and soften the dough, and you may also break the chocolate into dusty shards. In this recipe, warm dough + extra friction puts you back on the path to flat, lacy cookies rather than thick, chewy ones.

2
Cover and chill the dough thoroughly
Cover the bowl tightly with plastic wrap or a lid and chill the dough in the refrigerator for at least60 minutes, or up to 24 hours. The dough will firm up noticeably and feel scoopable but solid when it’s ready.
Why this works:Chilling allows the flour to fully hydrate and gives the butter time to resolidify. When the cookies hit the hot oven, the cooler, firmer dough melts more slowly, so the cookies stay thicker and chewier instead of racing outward into a thin sheet.
The first time I tested this recipe with only a 15-minute chill, the cookies smelled great but baked into a wide, almost brownie-thin layer. With the full 60-minute chill, the same dough gave me beautifully thick, sturdy cookies. If you’re in a rush, don’t cut the chill to less than 45 minutes—it really matters here.
3
Let the chilled dough soften slightly before scooping
When you’re ready to bake, take the chilled dough out of the fridge and let it sit at room temperature for5–10 minutes. It should still feel cool and firm, but you should be able to scoop it without bending your spoon.
This short rest makes scooping easier without undoing the structural benefits of chilling.
If the dough is rock hard and you try to force a metal scoop through it, you’ll either bend your scoop (ask me how I know) or compress the dough so much that the cookies bake up dense. On the other hand, if you leave the dough out until it’s soft and sticky again, you lose the spread control you just earned in the fridge.
Shape, Bake, and Cool for Thick, Chewy Cookies
1
Portion the dough into even scoops
Using amedium cookie scoopor a spoon, portion the dough into balls of about1½ tablespoonseach. You should get roughly24 cookiesfrom the full batch. Roll the scoops gently between your palms if you want a smoother, rounder shape.
Arrange the dough balls on the prepared baking sheets, spacing them at least2 inchesapart to allow for some spread.
Uneven scoops will bake at different speeds. In this recipe, the larger mounds will stay doughy in the center while the smaller ones can overbake and lose that chewy center. If you don’t have a scoop, use a tablespoon measure to portion as evenly as you can.

2
Optional: Press extra chocolate on top
If you like a bakery-style look, gently press a few extra pieces ofdark chocolateonto the tops of each dough ball. Don’t flatten them completely—just a light press to help the chocolate peek through once baked.
Pressing too hard will squash the dough balls and encourage them to spread more. For these cookies, keep them mostly rounded so they bake up thick and chewy instead of wide and thin.
3
Bake one sheet at a time
Place one baking sheet in the preheated350°F (175°C)oven. Bake for10–12 minutes, rotating the pan halfway through baking. The cookies are done when:
- The edges look set and slightly darker.
- The centers look puffed, matte, and just barely set—no longer shiny, but still soft.
- If you gently nudge the edge of a cookie, it holds its shape but the center still feels a bit tender.
The cookies will continue to cook and firm up from residual heat on the pan, so pull them when they still look slightly underbaked in the middle.
If you bake until the centers look fully firm and dry, the cookies will cool into a much crunchier texture and lose that chewy middle. On the flip side, if the centers are still shiny and look like raw dough when you pull them, they’ll sink into heavy, underbaked pockets around the chocolate.

4
Pan-bang gently for crinkly edges (optional)
For slightly crinkled, wrinkly edges, remove the baking sheet from the oven around the9–10 minutemark and gently tap it once or twice on a heat-safe surface. Return to the oven to finish baking. This encourages the edges to settle and ripple while leaving the centers thicker.
This gentle “pan-banging” technique is borrowed from modern bakery-style cookie methods and uses the brief collapse to build texture contrast.
Don’t overdo the banging. With this dough, aggressive tapping can cause the centers to collapse too much, especially while the fat is still very soft, which can bring you back toward thinner cookies.
5
Cool on the sheet, then transfer to a rack
Let the cookies cool on the baking sheet for8–10 minutes. They’ll look fragile at first but will firm up as the structure sets. After that, use athin spatulato transfer them to a wire rack to cool completely.
Cooling on the hot sheet lets the centers finish setting without overbaking the edges in the oven.
If you try to move these cookies immediately, the still-soft centers can tear away and leave a chocolatey crater behind. If you leave them on the hot sheet for 20+ minutes, though, the bottoms can over-firm and lose that bendy, chewy texture.
6
Repeat with remaining dough and enjoy or store
Repeat the scooping and baking process with the remaining dough, always baking one sheet at a time for the most even results. Once fully cooled, store the cookies in an airtight container at room temperature.
Well-baked and properly cooled, these cookies hold their shape nicely, making them sturdy enough for cookie trays and bake sales while staying soft and chewy inside.
Stacking the cookies while they’re even slightly warm can trap steam and make the orange-scented centers gummy. Let them cool completely before packing if you’re gifting or transporting them.
Chef's Perspective
Maggie's Review
These Chocolate Orange Deluxe Cookies stay thick, chewy, and stackable thanks to cool butter, a full chill, and extra egg yolk for structure. The orange zest is rubbed right into the sugar so the citrus note holds its own next to dark chocolate. Ideal for cookie platters, gifting, and bake sales where you need cookies that look as good as they taste.
✓What we Love
- Bold orange flavor that doesn’t get lost behind the dark chocolate
- Reliable thick, chewy texture that resists spreading into puddles
- Sturdy enough for gifting trays, shipping, and bake sales
!Be aware
- Requires at least an hour of chilling before baking
- Best flavor depends on having fresh oranges for zest
Kitchen Essentials
Stand mixer or hand mixer (you don’t need a stand mixer; a simple hand mixer or strong arm and wooden spoon will work)Large mixing bowlMedium mixing bowlMeasuring cups and spoons or digital kitchen scaleMicroplane or fine grater for orange zestWhiskSturdy spatula or wooden spoonMedium cookie scoop or tablespoon measureRimmed baking sheetsParchment paper or silicone baking matsPlastic wrap or reusable bowl coverWire cooling rackThin metal spatula
Nutrition Facts
24 servings per recipe
Serving size1 cookie
Amount per servingCalories
98% Daily Value*
Total Fat 6.1g
Saturated Fat 3.8g
Trans Fat 0.2g
Cholesterol 31mg
Sodium 6mg
Potassium 17mg
Total Carbohydrate 10.5g
Dietary Fiber 0g
Sugars 10.4g
Protein 0.5g
* Percent Daily Values are based on a 2,000 calorie diet. Your daily values may be higher or lower depending on your calorie needs.
Important Disclaimer
Nutritional values are estimates. Ingredient brands and manufacturing processes vary. This site does not provide medical dietary advice. Always verify ingredient labels if you have severe allergies.
Recipe Secrets & Tips
Baker's Notes
For the most consistent results, weigh your flour, start with butter that’s cool to the touch (not glossy or melty), and don’t rush the chilling step—firm dough is what keeps these cookies from turning into one big puddle on the pan.

